Fdupes-gui v0.2.1

In 2021, I mashed together this quick utility, a very simple gui front-end to fdupes because I needed to clean up a bunch of documents. It was also an experiment in trying out Flutter Desktop.

Last year I released it to the public on github, more as an educational tool for people wanting to see some flutter desktop app source. Because these days, I’m force to work on macOS, I also released a mac version of an app for the first time in my life. 😳

Turns out, there is 1 other person in the world, who used my app. He noticed the app wouldn’t find the fdupes exec if it was launched from the gui. It was a known shortcoming, but this bug report triggered me to make a better effort. 😉

In v0.2.1, when the exec is not found, you can locate it manually. The location is stored so that subsequent launches automatically use fdupes from the specified location.

Available for linux and macOS, windows might follow.

new app: fdupes-gui

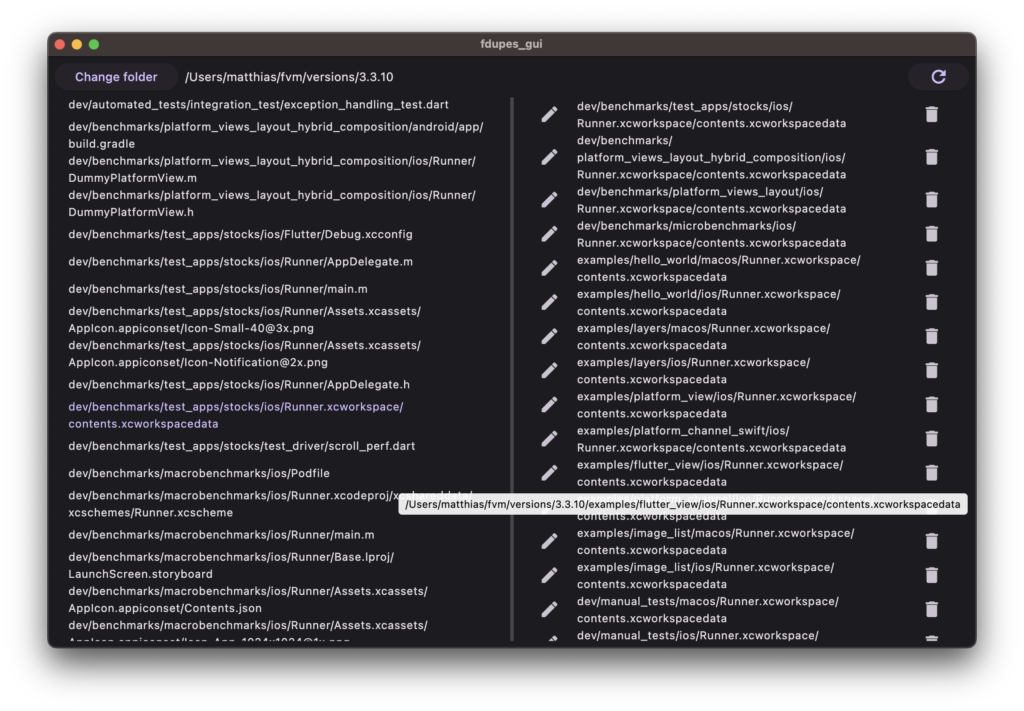
A few years ago, I wanted to clear out the duplicates I had in my Google Drive. It’s not a trivial task as deleting files with the same filename does not cut it: I receive tons of generated pdf’s with the same filename and when time is short (or when being lazy 😉), I just save it to Google Drive as is. The inevitable consequence is: one day cleanup is needed. 😁

Anyone familiar with linux might think of the ‘fdupes‘ utility: it not simply compares the filename but, according to the manual:

comparing file sizes and MD5 signatures, followed by a byte-by-byte comparison

Excellent. Except, when you have to go through tons of documents and files, it’s not that practical. So, with my 2021 new year’s resolutions still fresh in my head, I persevered and coded a quick gui mashup.

Workflow

  • The gui presents a list of all file duplicate groups.
  • When you click on a group, you are presented with a list of all duplicates.
  • You inspect what the document is about by clicking on the filename, which opens it with the default viewer for this file type.
  • You rename one of duplicates to the desired final filename by clicking the ‘Edit’ icon.
  • You delete the renaming files using the ‘Trash’ icon.
  • The UI prevents you from deleting the last one 😉

Simple, but effective!

Release

I coded this a few years ago, but apparently never got to publishing the code, or even just a blog post. This weekend, I cleaned up the project and added the macOS platform (originally only linux was supported). I feel weird about supporting macOS, but the world is how it is: if you want to publish your app for iOS, you need to buy Apple hardware..

Find the project on github.

Quick KDE KWin hack: Ignore global shortcuts except alt-tab

From time to time a pet peeve can reach a critical level of annoyance at which it starts to irritate. You google it, hoping to find a solution or at least some allies, but if none turns up and you’re out of time, you simply give up and hope a solution will magically manifest itself one other day. But what if that day never comes? Luckily for us, open source enthousiasts, we can do something about it ourselves 🙂

Context

I’m quite an avid shortcut user. Linux/KDE is an environment where this type of user feels right at home. Not only do most actions in a software have a shortcut, you can also define lots of system-wide or global shortcuts. Kwin, KDE’s window manager defines quite a few out of the box.

Problem

This is all fine and dandy until you want to use this cross-platform software which you got used to in a different environment (i.e. windows at work) and you want to start using it at home. When the application is not (KDE) shortcut friendly or you are so used to the windows keymap that it’s a pain to learn a new scheme, you start to feel frustrated. Learning a new shortcut scheme seems the best solution but this doesn’t work well when you have to maintain 2 shortcut schemes in your head, depending on your environment (home vs work, your computer at work versus a colleague’s computer).

A typical example here would be some IDE, for example Intellij IDEA. Although the IDE does provide a KDE keymap by now, I started using it ages ago when there simply was no alternative keymap (nor a community edition or even official linux version, I guess). Also, I used linux only occasionally back then. These shortcuts are hard-wired by now and it is already hard enough to keep in mind whether I’m using Intellij or Visual Studio.

Another possibility is that the application really needs that much shortcuts that it just can’t bother with the shortcuts which may or may not be defined by the environment or workspace. One example of such complex application is Blender. Try it out and you’ll see what I mean. 😉

KDE, being the configurable desktop environment, does offer some configuration settings. For each window, Kwin allows you to define rules which match certain windows / applications which creates a config. Using this config, you can configure special window attributes. One setting is to block all global shortcuts.
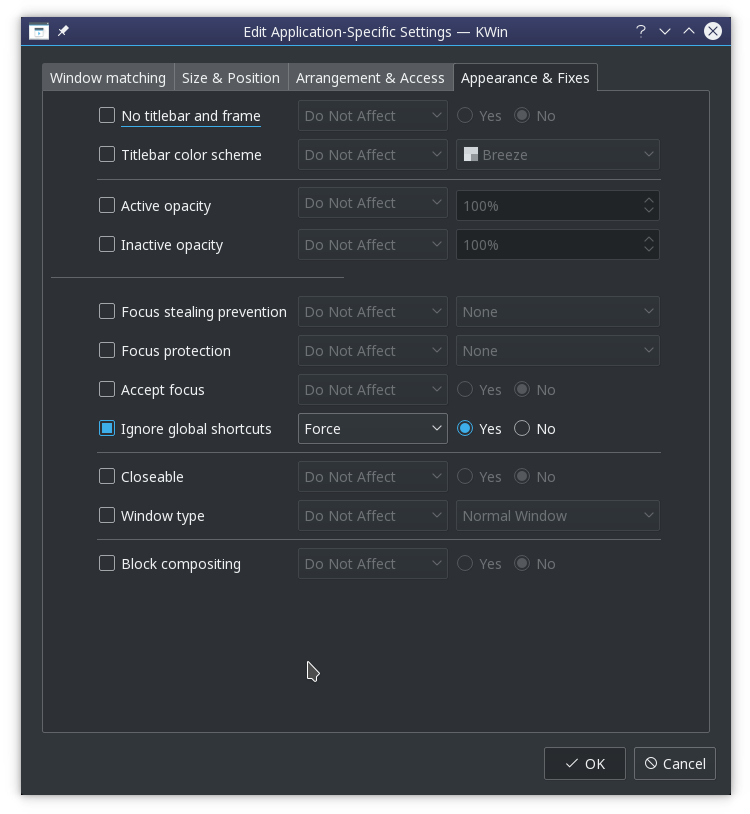
This allows you to use your favorite application with its favorite native shortcuts. Of course, most people use more than 1 application at the same time. However, since all global shortcuts are blocked, the alt+tab shortcut to switch windows is blocked too. Alt+tab is not a special shortcut to KDE, it simply is a shortcut that happens to be assigned globally to the “Walk through windows” action exposed by the KWin component to the System Settings. Lacking any window switching shortcut, you adapt and start using the mouse to switch applications. There are times you cope just fine. But there are other times it is just one thing too much that annoys you. 🙂

Solution

So how to fix this? Just like any other problem you have with an open source application: fetch the source, fix and build! 😉

Since I just wanted a quick fix (I thought, let’s check this out for 30 mins, which turned out to be a lot longer of course), I chose to patch the behavior of the “Ignore global shortcuts” setting to exclude the Alt+Tab shortcut (more precisely, the shortcut currently assigned to the “Walk through windows” action). I briefly investigated KWin’s scripting abilities but it turns out the required functionality is not exposed.

I will now document the process, which took place on opensuse leap 42.3. You may want to tune out now if you don’t care about the gritty tech details. 😉

Where is the source?

I thought it had to be kwin, right? So I checked out the source from github and started searching for “Ignore global shortcuts”. It turned out to just call something in kglobalaccel which is not part of kwin.

Getting my hands dirty, I first fired up a VM I had lying around in order not to f*ck up my currently running system. Next I installed Qt Creator to easily navigate the code. Also, never forget you have to checkout the tag for the version you are currently running! (can be a treasure hunt by itself)

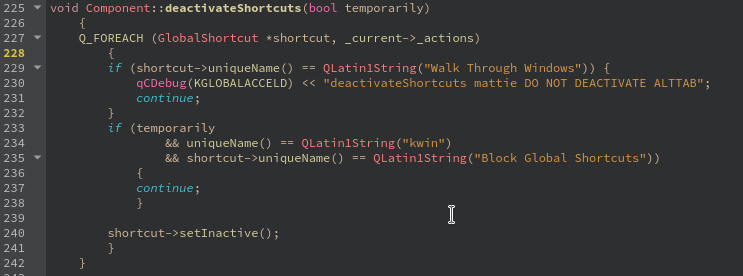
Browsing the source, I finally find a possible tweaking point in the src/runtime/component.cpp -> deactivateShortcuts method. It disables all shortcuts when a window is entered which has a “Ignore global shortcuts” rule. So I simply added an exclusion for the “switch windows” action.
Building a patched rpm

Time to try it out! In order to build it, you will need to install its dependencies. On an rpm based system, the easiest way to go forward is to do a “sourceinstall” of the rpm in case. For that, we first have to know which rpm contains the affected shared object (.so file).

You can take different routes to pin point the rpm. I checked the CMakeLists.txt to see what the output targets were. When you build, you can also see the class pass by and check into which library it gets linked into. Using that .so file, you can find the rpm using “rpm -qf <.so>”

An alternative way would be to find a kde related rpm matching “global” and then checking its contents (using “rpm -q –filesbypkg <rpm>”) for the .so file.

Once you know the rpm, you can easily install all required build dependencies by issueing a zypper sourceinstall command: “zypper si <rpm>”

The hard part: logging

I wanted to add some debug output to see if I was looking at the right place in the source base and how frequently the code got called. Now things got messy. You’d think patching the code was the hard part, guess what.. 😉

I had played with logging before in KDE, but of course things have changed with KDE 5. Nowadays, KDE uses Qt’s default logging mechanism. It meant figuring out the logging category used by kglobalaccel and finding a way to activate it. The logging category was nicely tucked away in logging_p.h: “kglobalaccel-runtime”. Activating it seemed to be trickier. According to the Qt documentation, you can alter the log level through an env var QT_LOGGING_RULES. Since I was adapting a core component, I needed to set the env var before logging in. On opensuse you can create a file /etc/profile.local which gets sourced by /etc/profile.

I added the env var and it seemed to work (=showed up), unfortunately still no logging. More precisely, nothing showed up in ~/.xsession-errors-:0. I started adding log statements all over the place, analysing the .so file to check whether my modified method was actually included in it (readelf -Ws libKF5GlobalAccelPrivate.so.5.32.0  | grep deactivate), etc.. Until I realised I didn’t check the journal (journalctl -b -0) yet, there it was. 🙂 Bonus points: the code change had its intended effect!

End result

So there I had it, a working patch WITH logging ⇒ pure SATISFACTION 🙂

Feel free to share this satisfaction by downloading the .so and installing it in /usr/lib64 (use at own risk). I’ve been using it for 2 months now without problems. It’s a good hack until a more fundamental solution is in place. First steps have been taken! 😉
Activating HW acceleration for embedded YouTube videos

Ever since Google Chrome became terribly slow in gmail, drive, etc regardless of computer or platform, I’ve picked up Mozilla Firefox again. The switch didn’t go painless but I really was tired of typing a whole sentence before Chrome would display it. This problem produces itself not only on google sites but actually in about any text box I would type, be it intermittently.

The main issue with switching to Firefox was stuttering video playback. As you may know, chrome bundles its own flash plugin which is actually the same plugin but tweaked to work optimally with chrome (pepper api). At the same time google controls distribution/patching.  So, if google can tweak the plugin for good performance, why can’t we? 😉

First thing I discovered, is that somehow flash hardware acceleration was disabled. You can enable this by right-clicking on any flash video and click on “settings”. In the “Display” tab, you can check “Enable Hardware Acceleration”.

flash enable HW acceleration settingSmooth youtube vids FTW! Fullscreen video’s also showed up on the correct monitor now (dual head setup). My joy was only for limited time, as I discovered hardware acceleration dit not work for embedded youtube video’s. I was happy nevertheless as the bulk of video’s I watch are on youtube.

However, today, watching the Jolla Tablet intro movie embedded on the site, I could not help feeling the itch again. Why oh why did this play fluently in chrome but did it suck so hard in firefox? Check out this framerate:

yt_embedded_noHWaccel1I started by creating a virgin system account to avoid having my 7 year old home dir, possibly dragging along some evil deprecated setting, be the culprit. This didn’t change anything but at least I had both a blank Firefox and Chrome profile to test with.
First I was under the impression that there would have to be a global flash settings file since when right-clicking on the embedded video, it showed the “Settings” as disabled. There does indeed exist such file: /etc/adobe/mms.cfg in which you can put “EnableLinuxHWVideoDecode=1”. This only crashed my firefox. I did install an additional vdpau package but it didn’t matter. Also, looking at the “Nerd stats” (right-click on video), I learned even youtube vids didn’t have hardware accelerated decoding, only accelerated rendering. So I didn’t proceed on this path.

Now let’s check out how chrome is doing it. Pulling up the “Nerd stats” did surprise me: chrome does not use flash by default for embedded video’s, it uses WebM/VP9!

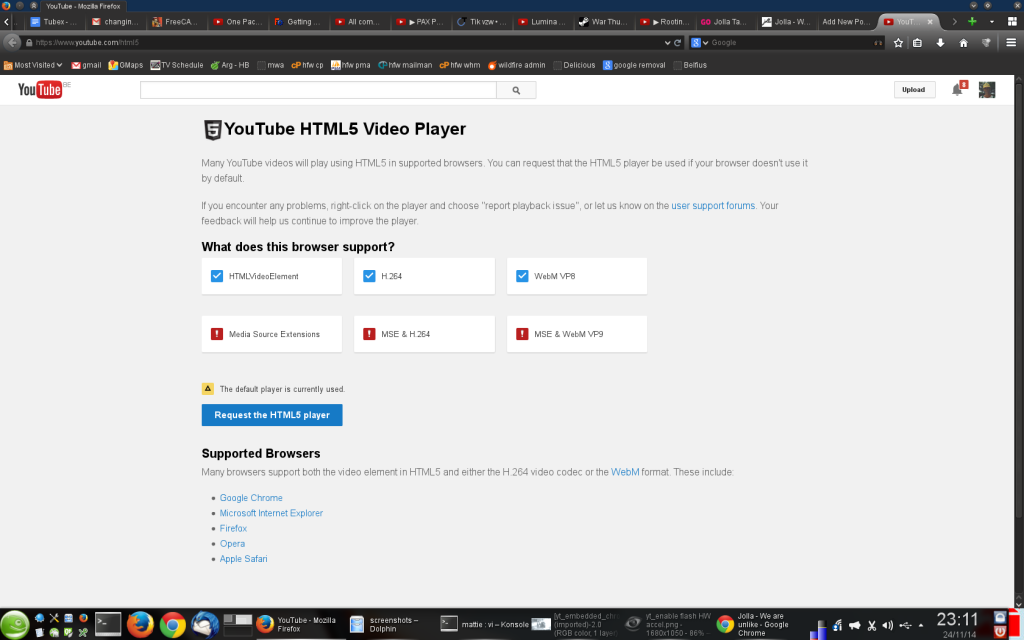
This begs the question: how is Firefox’s WebM support? Turns out it’s no problem, just change your youtube html5 setting from “default player” (=flash) to “html5”.

youtube html5 settingsSo the  chrome pepper flash tweak actually came down on not using flash. 🙂 Youtube does this by default on chrome but not on firefox. Naughty Google!

You may notice that Firefox does not support all youtube hmtl5 features yet. In particular, you will be served VP8 video’s instead of VP9 which may make a difference in the available resolutions. However, Media Source Extensions and WebM VP9 can already be activated by setting:

media.mediasource.enabled = true

in about:config. Experimental h264 support can be activated with:

media.mediasource.ignore_codecs = true

You can track the MSE support in firefox in this bug report.

Itch scratched and fixed. Finally 🙂

Convert PDF to image files

Another entry in my PDF series. 🙂

At work I had to convert a few PDFs into jpeg files. The PDF files actually contain just images, so extracting the images would’ve been as good, but converting PDF pages to images is easier. 🙂 At least on windows. On linux you could use pdfimages, which should be available for your distro through some poppler util package.

A general approach is to use the versatile ImageMagick software. Using the convert command, it’s simply a matter of:

convert -density 200x200 -quality 85% inputfile.pdf outputfile%03d.jpg

to convert inputfile.pdf to a set of jpeg files. Of course you can choose any supported output format you like: png/bmp/gif/etc.. The density option is important as it specifies the output dpi which is only 72 by default. Imagemagick uses Ghostscript to do the pdf reading, so on windows you have to make sure that environment is set up correctly. In my case I had to add its bin directory to the path and set the working dir to the lib path as it didn’t find gs_init.ps otherwise (adding to the path didn’t help). If you know a better way, please let me know in the comments. I also specified the quality option to have a jpeg quality factor of 85, which is 75 by default.

Since I had to process a batch of them, I thought it would be nice to have a cool batch script to do them automatically. Here is what I came up with:

C:
set path=%path%;C:\programs\gs\gs8.54\bin
cd C:\programs\gs\gs8.54\lib
for %%C in (%*) do call :startconvert %%C
goto :eof

:startconvert
convert -density 200x200 -quality 85%% %1 %~dp1%~n1%%03d.jpg
goto :eof

Replace the paths as appropiate. To use the bat file, simply drag and drop one or more pdf file on the bat file. It will put jpeg files in the same directory as the pdf file and number them using 3 digits (%03d printf format). %~dp1 stands for the full path of the 1st argument file, %~n1 for the name only (without extension). Also note you have to escape all other %’s.

iTunes on linux

Read the update below!

I hate to admit it: today I created an iTunes store account. In my defense, I felt forced, as the CD I wanted to buy was only available as a physical CD and not in digital download form. It will probably become available in digital form in a year or so, but who wants to buy a 2010 compilation CD in 2012? 😉 And who wants a jewel case CD which you have to rip anyway to have any use of it (besides gathering dust).

So today, once again, I gave installing iTunes on linux another try. I followed the google #1 guide which suggested to install an old version (7.2). Unfortunately, when you go to the store, it says it can’t connect or that the service is temporarily down or something. So I thought, wine updates every 5 breaths, I wouldn’t be surprised if it actually runs the latest version. Store connection works indeed in iTunes 10! I created a login from within iTunes, made a test purchase, and yes, we have lift off. 🙂 I can see how iTunes is such a success. Just type in the search box, click and a few seconds later you have a high quality drm free mp4/AAC on your harddrive. Very tempting indeed. And the excellent recommendation system only encourages too of course.
A guide for converting to mp3 (or wave) from within iTunes can be found here. I don’t need that on the desktop, .m4a plays back fine, but my car lofi radio only plays mp3/wma.

I’m still a bit confused as to why the CD is only downloadable from iTunes and not form the publisher’s webshop. I guess they have an exclusive deal with Apple to only release the downloads after some time..

Update: The next morning I arrived at work and installed iTunes to download my newly purchased album. Surprise, surprise! iTunes does not allow one to redownload a purchased song!! It’s insanely unbelievable in this time and age, but yes, it is impossible right now. I guess most people don’t know any other way, but for a lot of gamers who use steam, it is the most ordinary thing to do.

Time Machine for Linux: Back In Time

Recently, I watched a vid about Apple’s Time Machine and was quite impressed. For the first time in ages, I was considering to try out MacosX, after all, you have to give them credit: they just keep innovating as no other computer company. The plan was quickly abandoned though, when I discovered it wouldn’t run on my newly bought AMD monster-machine (post about that in queue ;)).

Anyhow, I searched some alternatives and somehow nothing as user-friendly showed up.. Until today I stumbled upon the solution by accident while I was checking out LinuxJournal’s tech tips! Quite interesting/entertaining stuff there btw. 🙂 I’m talking about about Back In Time and considering the Ubuntu dev, it even has a KDE4 gui, yay! 🙂

Check out the LJ screencast and the LifeHacker article.