I finally succeeded in releasing the Focus WTV Live app for Android TV. The biggest hurdle was getting through the Play store approval process. Rejections without any clue about what was going wrong. It doesn’t help that Google has disabled the Pre-launch report, running your new build on various hardware, surfacing problems you would otherwise never find out. I suspect Google has disabled pre-launch report in favor of AI payloads. 😉
So when you do encounter such a problem, without the pre-launch report combined with useless rejection feedback, you’re really in the dark. Well, I did figure it out after all, but it took lots of effort and adding crashlytics reporting which otherwise would not have been needed. It turned out to be a video player issue on low-end (read: crappy) hardware. Oh well, all’s well that ends well..
10 years ago, I cancelled my cable TV subscription and switched to internet streaming-only using the first Android TV device, Google’s Nexus Player. It was a great cost saver. I never watched live TV to begin with, as I always wanted to skip forward during ads. My new home was Netflix and having no ads was a breath of fresh air.
In the beginning, I would miss some Belgian content here and there, but by now, every major Belgian TV channel has a free app streaming live TV and on-demand content (with paid options to reduce ads or watch additional content).
My parents barely watch TV except for the news, so I suggested to make some savings and cancel their overpriced Telenet cable TV subscription. It turns out there’s only 1 problem: they like to watch the regional news channel WTV from time to time.
Streaming WTV to an Android TV device, what are the available options?
Android TV app: the Focus/WTV app is not available for Android TV.
Cast from phone: casting a stream from the Android app on your phone is not supported.
Cast from website: casting from the website is supported, but the stream hangs after a few seconds and refuses to resume.
Ideally, my parents can just use an app on the TV, it makes things less complicated.
So, what is the solution? Create a new app! 😉
A few years ago, I gave it a first try, but somehow did not succeed. Maybe I was trying to support login and on-demand content. Yesterday, I lowered the bar and thought just streaming live content would already be sufficient (it’s what my parents do now).
To my surprise, I quite quickly had a working proof of concept. I was still using the project I created a few years ago using an old flutter version. So I upgraded the flutter version and it no longer worked on my Nvidia Shield TV, but it still worked on the emulator. It does not render video anymore, only audio. I also tried out the latest flutter 3.29.2, and even though I do get image again, it’s all red. Long story short: don’t use impeller yet for hardware-acceleration sensitive stuff like video streaming.
I would show a screenshot, but there’s nothing to see but the live stream. 🙂
From time to time a pet peeve can reach a critical level of annoyance at which it starts to irritate. You google it, hoping to find a solution or at least some allies, but if none turns up and you’re out of time, you simply give up and hope a solution will magically manifest itself one other day. But what if that day never comes? Luckily for us, open source enthousiasts, we can do something about it ourselves 🙂
Context
I’m quite an avid shortcut user. Linux/KDE is an environment where this type of user feels right at home. Not only do most actions in a software have a shortcut, you can also define lots of system-wide or global shortcuts. Kwin, KDE’s window manager defines quite a few out of the box.
Problem
This is all fine and dandy until you want to use this cross-platform software which you got used to in a different environment (i.e. windows at work) and you want to start using it at home. When the application is not (KDE) shortcut friendly or you are so used to the windows keymap that it’s a pain to learn a new scheme, you start to feel frustrated. Learning a new shortcut scheme seems the best solution but this doesn’t work well when you have to maintain 2 shortcut schemes in your head, depending on your environment (home vs work, your computer at work versus a colleague’s computer).
A typical example here would be some IDE, for example Intellij IDEA. Although the IDE does provide a KDE keymap by now, I started using it ages ago when there simply was no alternative keymap (nor a community edition or even official linux version, I guess). Also, I used linux only occasionally back then. These shortcuts are hard-wired by now and it is already hard enough to keep in mind whether I’m using Intellij or Visual Studio.
Another possibility is that the application really needs that much shortcuts that it just can’t bother with the shortcuts which may or may not be defined by the environment or workspace. One example of such complex application is Blender. Try it out and you’ll see what I mean. 😉
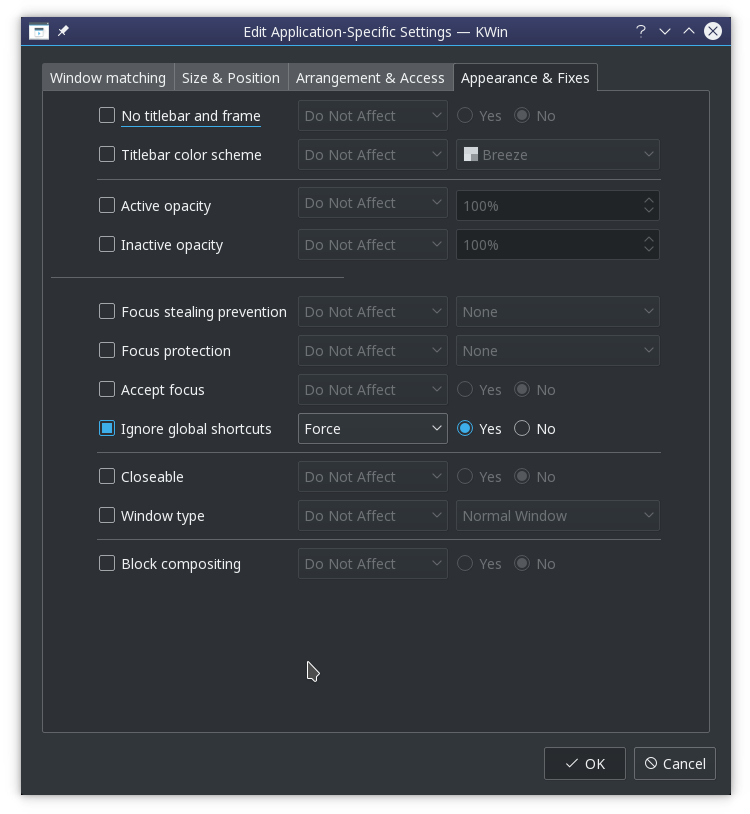
KDE, being the configurable desktop environment, does offer some configuration settings. For each window, Kwin allows you to define rules which match certain windows / applications which creates a config. Using this config, you can configure special window attributes. One setting is to block all global shortcuts.
This allows you to use your favorite application with its favorite native shortcuts. Of course, most people use more than 1 application at the same time. However, since all global shortcuts are blocked, the alt+tab shortcut to switch windows is blocked too. Alt+tab is not a special shortcut to KDE, it simply is a shortcut that happens to be assigned globally to the “Walk through windows” action exposed by the KWin component to the System Settings. Lacking any window switching shortcut, you adapt and start using the mouse to switch applications. There are times you cope just fine. But there are other times it is just one thing too much that annoys you. 🙂
Solution
So how to fix this? Just like any other problem you have with an open source application: fetch the source, fix and build! 😉
Since I just wanted a quick fix (I thought, let’s check this out for 30 mins, which turned out to be a lot longer of course), I chose to patch the behavior of the “Ignore global shortcuts” setting to exclude the Alt+Tab shortcut (more precisely, the shortcut currently assigned to the “Walk through windows” action). I briefly investigated KWin’s scripting abilities but it turns out the required functionality is not exposed.
I will now document the process, which took place on opensuse leap 42.3. You may want to tune out now if you don’t care about the gritty tech details. 😉
Where is the source?
I thought it had to be kwin, right? So I checked out the source from github and started searching for “Ignore global shortcuts”. It turned out to just call something in kglobalaccel which is not part of kwin.
Getting my hands dirty, I first fired up a VM I had lying around in order not to f*ck up my currently running system. Next I installed Qt Creator to easily navigate the code. Also, never forget you have to checkout the tag for the version you are currently running! (can be a treasure hunt by itself)
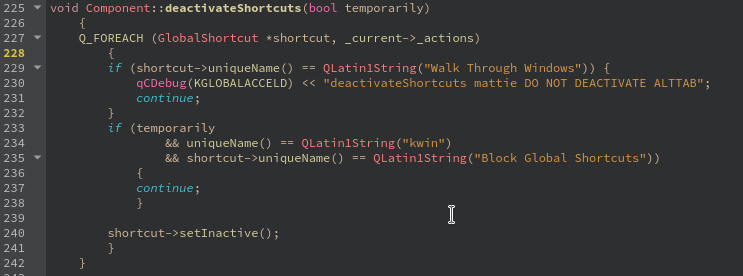
Browsing the source, I finally find a possible tweaking point in the src/runtime/component.cpp -> deactivateShortcuts method. It disables all shortcuts when a window is entered which has a “Ignore global shortcuts” rule. So I simply added an exclusion for the “switch windows” action.
Building a patched rpm
Time to try it out! In order to build it, you will need to install its dependencies. On an rpm based system, the easiest way to go forward is to do a “sourceinstall” of the rpm in case. For that, we first have to know which rpm contains the affected shared object (.so file).
You can take different routes to pin point the rpm. I checked the CMakeLists.txt to see what the output targets were. When you build, you can also see the class pass by and check into which library it gets linked into. Using that .so file, you can find the rpm using “rpm -qf <.so>”
An alternative way would be to find a kde related rpm matching “global” and then checking its contents (using “rpm -q –filesbypkg <rpm>”) for the .so file.
Once you know the rpm, you can easily install all required build dependencies by issueing a zypper sourceinstall command: “zypper si <rpm>”
The hard part: logging
I wanted to add some debug output to see if I was looking at the right place in the source base and how frequently the code got called. Now things got messy. You’d think patching the code was the hard part, guess what.. 😉
I had played with logging before in KDE, but of course things have changed with KDE 5. Nowadays, KDE uses Qt’s default logging mechanism. It meant figuring out the logging category used by kglobalaccel and finding a way to activate it. The logging category was nicely tucked away in logging_p.h: “kglobalaccel-runtime”. Activating it seemed to be trickier. According to the Qt documentation, you can alter the log level through an env var QT_LOGGING_RULES. Since I was adapting a core component, I needed to set the env var before logging in. On opensuse you can create a file /etc/profile.local which gets sourced by /etc/profile.
I added the env var and it seemed to work (=showed up), unfortunately still no logging. More precisely, nothing showed up in ~/.xsession-errors-:0. I started adding log statements all over the place, analysing the .so file to check whether my modified method was actually included in it (readelf -Ws libKF5GlobalAccelPrivate.so.5.32.0 | grep deactivate), etc.. Until I realised I didn’t check the journal (journalctl -b -0) yet, there it was. 🙂 Bonus points: the code change had its intended effect!
End result
So there I had it, a working patch WITH logging ⇒ pure SATISFACTION 🙂
Feel free to share this satisfaction by downloading the .so and installing it in /usr/lib64 (use at own risk). I’ve been using it for 2 months now without problems. It’s a good hack until a more fundamental solution is in place. First steps have been taken! 😉
I recently upgraded my Nexus Player to Marshmallow and guess what, the OnScreenClock app crashed. No big deal, I thought, let’s “just” fix this by properly requesting the overlay permission using the new permission system. Reading up on the topic, I learned there are 2 types of permissions: normal and dangerous permissions. Dangerous permissions need explicit permission from the user while normal permissions are automatically granted by the system. However, a small info panel (like for tidbits) in the documentation grabbed my attention, stating (parafrased): “oh, and btw, you also have some special permissions”. So actually there are 3 kinds of permissions! Why not say that up-front 😉
Anyway, you might have guessed, the OSD clock app uses a special permission called SYSTEM_ALERT_WINDOW which allows it to create windows that draw on top of anything else. You might think (as I did at first): no problem, let’s just ask the user for this OVERLAY permission. This is a nice idea in theory, and it actually works on your average Marshmallow phone. Android TV would not be Android TV if they did not add something extra to the challenge. Indeed, all Marshmallow Android TV roms that I have encountered (to be honest, so far only Nexus Player and Nvidia Shield, there are not much more at the moment), do NOT provide a GUI for allowing the user to allow the app this permission. They do have a gui for dangerous permissions but not for “special” permissions! I guess we finally know now what makes them special. 😉 A bug has been reported (originally for Android Wear which suffers the same problem) but no response from google.
So yeah, in case of my OSD clock app: no permission = no app. But wait, no problem, let’s just revert back to Lollipop target sdk and everything’s fine like Marshmallow never happened, right? Well, except if you already published a version of your app targeted for Marshmallow. In that case, you are not allowed by Google’s Play store to downgrade your target SDK. That’s really too bad.
That’s why I had no other choice than to create a new app with a similar name and update the current app to show a deprecation notice, inform the users of the new app and hope they understand what to do. So, goodbye nice reviews and stars, goodbye established user-base… Congratulations Google, you win.
Disclaimer: please don’t take this post too serious as I wrote it on a ranting spree, failing to keep consistence or structural coherence, using hyperboles to keep you entertained. You’ve been warned 😛 As with many funny things, there’s some truth in there though 😉
About a year ago, I bought an Android TV device: Nexus Player. That fact alone I could talk about for an hour, but let’s stay on-topic. 😉 Being introduced to Netflix and the concept of binge-watching, I had to protect myself from wasting all my time. Although I never used a clock on my tv before, its existence and use now became blatantly obvious to me. Unfortunately, neither my tv set nor the nexus player/android tv provide this! Android TV apps were (and still are) scarce so I took on the burden of the app dev and decided to try it myself, can’t be too difficult, riiight? 😉
After having taken the standard android and android tv specific hurdles, I quite quickly had something running that worked sufficiently for me. But what about “all” these other android Tv users? Being the empatic man I am, I put it on the app store, hoping to help others. As most often is the case, it turns out every user has different needs 😉 People want to use it on tablets, phones,.. So it had to become the super OSD clock app! Of course.
The requirements were boldly defined:
Show a clock
Be available on all android devices, from api level 10 (gingerbread) and up
Provide easy positioning with predefined anchors for each corner
Configurable font size
Optional background to make the clock readable on all surfaces
Configurable color (everybody likes colors, no?)
Android TV specific UI’s (leanback interfaces). The Nexus Player comes with a D-pad remote. All user interfaces should be as intuitive as possible using the D-pad.
Choose between digital or analog clock.
One year later, I can safely say that any of these features turned out to be much more complicated than anticipated. 🙂
1. Show a clock
Sounds simple, right? The problem is, it’s not just a clock. It should be an on-screen clock, meaning: on top of EVERYTHING at ANY TIME. I wasn’t sure if it was possible on Android. When I found out how to do it, I wasn’t sure it would work on Android TV (didn’t at first). But with some perseverance, the hurdle was taken. After that first achievement, I celebrated for a few months (ie I was lazy, development stalled and I preferred to binge-watch instead ;)). Picking it up again, I realized the journey had just begun.
2. Be available on all android devices, from api level 10 (gingerbread) and up
If you ever tried making an app that works well on every device from api level 10 to 23, you know this is no mean feat. I learned compatibility layers the hard way, thinking it would be easy. 😉 Tip: use compatibility lib from the start.
3. Provide easy positioning with predefined anchors for each corner
So it turns out there are tons of ways to define the available screen estate in android, what’s next… I want my clock in the upper right corner. Can’t everybody else offset from that one corner? On tablets you want to be able to drag the clock to position it? Of course, anything is possible. But I had to narrow the scope down to be able to release. Instead of providing touch on tablets and and a DPAD nav on android TV, I just put 4 simple buttons. It’s ugly but it does the job, for now. At least I made the button press repeatable so the user doesn’t have to click it like a crazy monkey (also, I felt like the standard NP remote wouldn’t survive it ;)).
4. Configurable font size
Here too, I had some nice ideas. Preview text of different size, seeing the right size instantly without having to increase/decrease until desired. But then I realized: if you can get a live preview of the clock position (no3), why not keep it consistent and provide a live preview of the size. Done. Wait.. configurable fonts? Naaaah
5. Optional background to make the clock readable on all surfaces
I thought I would make the clock more readable on light surfaces by putting it on a semi-transparent background. One day I implemented an outline instead and never looked back. It gives nice contrast and is nicely anti-aliased. It’s perfect, right? Of course not, read next.
6. Configurable color
If your app has colors, people want to customize that. I can’t really blame them for not liking my green on black clock. I’m color blind after all. 😉 The problem is, if I want to provide nice TV interfaces for my app, how does one choose a color using a TV remote? I’m still not entirely sure about that but I have a few ideas. Stay tuned.
7. Android TV specific UI’s (leanback interfaces)
I actually just explained the challenge in no6, I know bad article structure. But hey, I’m actually on a rant and just brain dumping 😛
If you want a TV app to be user friendly, you have to redefine its interface. There are several reasons why my attempts failed to this date.
a) Android TV dev was (is) in its infancy, so standard components are barely available and the compat lib only recently saw a release containing reusable preference items.
b) I had already so many hurdles to tackle, I thought: **** it, I’ll make a phone interface until the app is more functional and the UI is used only once anyway: just one time to configure the app! Nevertheless, it remains high on my todolist as a TV app should have a TV user interface, period.
8. Choose between digital or analog clock.
Aha, I kept the easiest one for last 🙂 Thinking about all the configuration options, I thought, the user should be able to choose the clock’s appearance, of course! Be it digital, analog, binary, what-have-you… I implemented an analog clock, and while I’ll admit it was fun, I doubt anyone uses it. 🙂 Development of the analog clock stalled (missing outline for example) in favor of more pressing features. Although, in the upcoming release, it kinda works..
This is only the high level overview of why it kept me so long from releasing this app. I stumbled upon all kinds of trouble from the service that was killed because android OS deemed it unactive to trying to obfuscate my publisher’s key.
On top of that, I complicated things by wanting to develop 2 apps in tandem AND reuse common code. Software development is all about reusable components, riiiiight? 😉 Unfortunately, up until recently I had absolutely no experience with either a) modular androids app or b) modularising code in git.
a) If you have never used gradle and maven before, you’re in for a treat. Try to keep it simple and you’ll get there 😉
b) I went from submodules to subtrees to strees. Enjoy this read, thank me later 😉
So yeah, this post is rather tongue-in-cheek and while touching some pain points, fails to offer clear solutions or solutions at all. That’s because this post is already long enough and I’m too tired to pump up the quality. Sorry if I lured anyone into reading this, hoping to learn something. You had been warned though 😛
So without further ado (queue drum roll), the one and only (literally!), on-screen display (OSD) clock, without ads (but with ads if you care about the developer), for Android TV ! (*cymbal*)
OnScreenClock OSD clock on Google Play store
Note: “Box art may deviate from actual in-app visuals.” 😉 The slick font is actually a residu of a dropped feature “configurable clock font”.
I thought it was caused by an authentication problem or my provider preventing me from sending from a random address.
The former I tried to address by making sure I was fully authenticated as to prove I was not trying to send spam. In java mail the following properties are relevant for sending authenticated mail using TLS:
and setting an authenticator on the mail session object:
Session session = Session.getDefaultInstance(System.getProperties(), new javax.mail.Authenticator() {
protected PasswordAuthentication getPasswordAuthentication() {
return new PasswordAuthentication(MAIL_USER, MAIL_PWD);
}
});
The latter I tried to address by sending from an alias that was associated with the original mailbox (user/pwd combo). Yet I kept getting the same exception.
Looking up the SMTP protocol and testing with telnet, I found out that normally you are supposed to provide a domain name when issueing the EHLO or HELO command. Since the api does not provide any methods for that, I looked for some more properties and indeed, it turns out you need to set
-Dmail.smtp.localhost
to make it provide the hostname for the EHLO command. According to the docs:
“Should not normally need to be set if your JDK and your name service are configured properly.” but apparently my case was not normal 🙂
Also worth noting is that you can turn on debug output with:
At work I tried setting a custom header (for example for basic authentication) when navigating the internet explorer activex component using OLE automation. I didn’t find much info on the web, so I post it here as a reminder.
Setting custom headers is in fact supported by the navigate method on the IWebBrowser2 interface as stated in the msdn: simply supply a 5th element. For example, in java it looks something like this: invoke("Navigate", new Variant[]{
new Variant(url),
new Variant(),
new Variant(),
new Variant(),
new Variant("Authorization: Basic QWxhZGRpbjpvcGVuIHNlc2FtZQ==")
});
Last night I was fooling around with lwjgl (nice lib btw), when suddenly I started getting the following exception:
org.lwjgl.LWJGLException: Could not choose GLX13 config
	at org.lwjgl.opengl.LinuxDisplayPeerInfo.initDefaultPeerInfo(Native Method)
	at org.lwjgl.opengl.LinuxDisplayPeerInfo.(LinuxDisplayPeerInfo.java:61)
	at org.lwjgl.opengl.LinuxDisplay.createPeerInfo(LinuxDisplay.java:782)
	at org.lwjgl.opengl.DrawableGL.setPixelFormat(DrawableGL.java:61)
	at org.lwjgl.opengl.Display.create(Display.java:871)
	at org.lwjgl.opengl.Display.create(Display.java:782)
	at org.lwjgl.opengl.Display.create(Display.java:764)
I googled and some Minecraft stuff turned up (seems it uses lwjgl as well), but only with mysterious “solutions”. I thought it was because I tried to run it from console (it ran fine before in IntelliJ), but it stopped working there too. Then I suspected mixing openjdk compiled code run by sun jre was the problem (seems lwjgl requires sun jre). Than I fumbled around with the java.library.path variable because it looked like a 64bit vs 32bit issue. NONE OF THAT!
I screwed up and it was late, so I decided to admit my defeat and go to bed.
Today I started my suse box, suddenly I realized my KDE desktop effects were disabled. Nvidia driver borked? Reinstalled my nvidia, even rebooted, all in vein!
I checked hardware acceleration with Urban Terror, smooth gaming!
Then I started to retrace my steps of last night.. I tried to install glc which in the past had proven to be quite a decent opengl capture program for linux.
I checked my repos and noticed I accidentally installed the 12.1 version! Uninstalling that does not fix it of course, probably some dependency messed up things good (although still quite subtle to keep everything else working ;)).
I finally come to the point of this post 😉 I wanted to know what I installed last night in the late hours that seriously borked my system.
Turns out rpm has a neat option just for that: –last !
So it goes like this:
# rpm -qa --last | less
yields amongst others:
libcurl4-7.21.2-10.11.1                       Mon 30 Jan 2012 11:06:02 PM CET
libcurl4-32bit-7.21.2-10.11.1                 Mon 30 Jan 2012 11:06:02 PM CET
glibc-locale-2.14.1-14.18.1                   Mon 30 Jan 2012 01:46:16 AM CET
glibc-devel-2.14.1-14.18.1                    Mon 30 Jan 2012 01:46:11 AM CET
parallel-printer-support-1.00-5.1             Mon 30 Jan 2012 01:46:10 AM CET
glibc-2.14.1-14.18.1                          Mon 30 Jan 2012 01:46:08 AM CET
gpg-pubkey-b185393d-47965930                  Mon 30 Jan 2012 01:45:55 AM CET
phpMyAdmin-3.4.9-30.1                         Thu 19 Jan 2012 09:22:30 PM CET
I managed to fubar my glibc 🙂 culprit found! Reverting this to the previous version fixed it!
Debugging your android app using a hardware device has several advantages, ie faster and more testing possibilities. On windows you have to install a custom USB driver, on linux it’s a matter of configuring your udev rules:
add a rules files in /etc/udev/rules.d , ie 44-android.rules