Project announcement: KonnectionMonitor

A few years ago, back in 2007 when I started using Linux as my primary operating system, I had a few itches to scratch because I missed my handy windows utility programs I’d become grown to. One of those utilities was TCPView which monitors incoming and outgoing TCP connections.
Hence, a new project was born: KonnectionMonitor. It’s goal was to mimic the TCPView utility on Linux/KDE.

Learning the /proc filesystem, I was amazed how easy it was to write such program. I’m not sure if it is the ideal way, but it works. Packaging seemed less easy though. 🙂 Nowadays we have a fully fledged opensuse build service and kde-apps.org integrating with it which makes publishing your soft a lot easier. I already gained some experience packaging VocTrainer and Telemeter Plasmoid, so it was only a matter of finding time to package this oldy. It’s baptized with the kind of cheesy name KonnectionMonitor which suggests it is built for KDE, but currently there is no KDE dependency present, so feel free to use it bloatingly-free in other desktop environments. 🙂

One remark: if you know TCPView, you will currently miss the close connection command in KonnectionMonitor. I’ve looked into ways on how to implement this on linux and there is no obvious way to do that (there is no api function). The only solution coming close to that, is sniffing the network and sending a RST (reset) packet (which in turn involves some other low level network tricks to be able to send a valid packet to the right host). I’ve already started experimenting with libpcap. It should be doable, stay tuned.

For now, we have version 0.1 which can be downloaded from kde-apps.org. The source is on gitorious.

KonnectionMonitor v0.1

Telemeter plasmoid v0.2

Most important improvements are:

  • Auto refresh respecting server-side request throttling.
  • Asynchronous webservice request prevent plasma from freezing (when webservice time-outs)

Keep in mind: the telenet webservice does not always work. 😉

Changelog
– added icon
– don’t let theme determine label color
– autorefresh option: takes ticket expiry into account
– deny refresh request when request is in progress
– don’t fetch at startup when configuration is needed
– gui feedback when refreshing
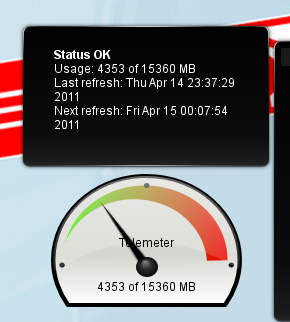
– show usage and next request time in tooltip
– on error, show webservice error message in tooltip
– refresh in separate thread: fixes plasma hang when webservice is out of service

Download

Telemeter plasmoid v0.2

Telemeter plasmoid v0.1

The telemeter plasmoid works for some time now but when I tried to distribute it, I entered packaging hell and things got deferred.. until some guy reminded me about it in the comments. 🙂

I could explain how I eventually managed to work around the packaging issue, but I’ll save that for another post 😉

Without further ado, Telemeter plasmoid v0.1 is released, go get it at kde-look.org!

Changelog:
v0.1 / 2011-04-06
=================
– fetch telenet account usage from telemeter webservice using gsoap
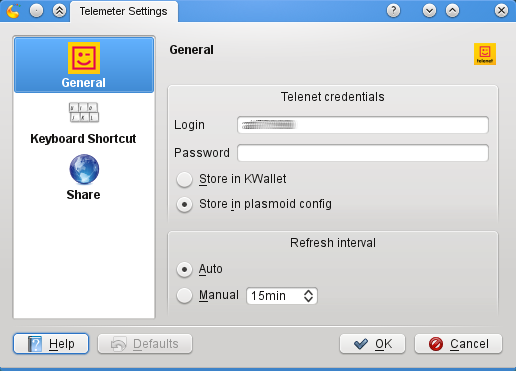
– store credentials in plasmoid config or kde wallet
– click on plasmoid to trigger manual refresh (telemeter service protects itself by denying access when too many requests happen consecutively, the plasmoid currently does not prevent you from doing this)
– automatically refreshes at configurable interval
– use Plasma::Meter::AnalogMeter with custom svg for better text positioning

Telemeter plasmoid configuration

Convert PDF to image files

Another entry in my PDF series. 🙂

At work I had to convert a few PDFs into jpeg files. The PDF files actually contain just images, so extracting the images would’ve been as good, but converting PDF pages to images is easier. 🙂 At least on windows. On linux you could use pdfimages, which should be available for your distro through some poppler util package.

A general approach is to use the versatile ImageMagick software. Using the convert command, it’s simply a matter of:

convert -density 200x200 -quality 85% inputfile.pdf outputfile%03d.jpg

to convert inputfile.pdf to a set of jpeg files. Of course you can choose any supported output format you like: png/bmp/gif/etc.. The density option is important as it specifies the output dpi which is only 72 by default. Imagemagick uses Ghostscript to do the pdf reading, so on windows you have to make sure that environment is set up correctly. In my case I had to add its bin directory to the path and set the working dir to the lib path as it didn’t find gs_init.ps otherwise (adding to the path didn’t help). If you know a better way, please let me know in the comments. I also specified the quality option to have a jpeg quality factor of 85, which is 75 by default.

Since I had to process a batch of them, I thought it would be nice to have a cool batch script to do them automatically. Here is what I came up with:

C:
set path=%path%;C:\programs\gs\gs8.54\bin
cd C:\programs\gs\gs8.54\lib
for %%C in (%*) do call :startconvert %%C
goto :eof

:startconvert
convert -density 200x200 -quality 85%% %1 %~dp1%~n1%%03d.jpg
goto :eof

Replace the paths as appropiate. To use the bat file, simply drag and drop one or more pdf file on the bat file. It will put jpeg files in the same directory as the pdf file and number them using 3 digits (%03d printf format). %~dp1 stands for the full path of the 1st argument file, %~n1 for the name only (without extension). Also note you have to escape all other %’s.

iTunes on linux

Read the update below!

I hate to admit it: today I created an iTunes store account. In my defense, I felt forced, as the CD I wanted to buy was only available as a physical CD and not in digital download form. It will probably become available in digital form in a year or so, but who wants to buy a 2010 compilation CD in 2012? 😉 And who wants a jewel case CD which you have to rip anyway to have any use of it (besides gathering dust).

So today, once again, I gave installing iTunes on linux another try. I followed the google #1 guide which suggested to install an old version (7.2). Unfortunately, when you go to the store, it says it can’t connect or that the service is temporarily down or something. So I thought, wine updates every 5 breaths, I wouldn’t be surprised if it actually runs the latest version. Store connection works indeed in iTunes 10! I created a login from within iTunes, made a test purchase, and yes, we have lift off. 🙂 I can see how iTunes is such a success. Just type in the search box, click and a few seconds later you have a high quality drm free mp4/AAC on your harddrive. Very tempting indeed. And the excellent recommendation system only encourages too of course.
A guide for converting to mp3 (or wave) from within iTunes can be found here. I don’t need that on the desktop, .m4a plays back fine, but my car lofi radio only plays mp3/wma.

I’m still a bit confused as to why the CD is only downloadable from iTunes and not form the publisher’s webshop. I guess they have an exclusive deal with Apple to only release the downloads after some time..

Update: The next morning I arrived at work and installed iTunes to download my newly purchased album. Surprise, surprise! iTunes does not allow one to redownload a purchased song!! It’s insanely unbelievable in this time and age, but yes, it is impossible right now. I guess most people don’t know any other way, but for a lot of gamers who use steam, it is the most ordinary thing to do.

Git: how to tag old commit

Another noob git tip. Tagging with git is easy and I won’t duplicate another explanation here. But suppose you want to tag a commit which you already pushed to another repo. When you push, nothing happens. I had tagged before, so I thought the problem was that I wanted to tag a commit which I already pushed.

But the trick to know here is: push simply does not push tags by default. You have to specify an option. So any tag you would want to share, on your last commit or any other commit, you would have to push explicitly:

git push origin <mytag>

or if you’d want to sync all tags in one go:

git push --tags origin

So, the title of this blog post was actually a trick question 😉

Win7RCAutoShutdownAlarm v0.2

Today I finally discovered why there always remained some garbage in the transparent area of the systrayicon where the piechart had passed by. It also turned out it really pays to read up-to-date Qt docs. I accidentally noticed the difference when reading the source. 🙂

Things learned:

  • when constructing an QImage you plan on using transparency on, always initialize it properly (using some fill you like).
  • when using QPainter on QImage, always use a alpha premultiplied format, for performance reasons.

I thought this new acquired knowledge justifies a new release. 🙂 So welcome v0.2 with the following changelog:


v0.2
- fixed systray render bug leaving garbage in transparent area
- added 128px taskbar icon
- added transparent circle background, otherwise you don't see anything near the end ;)