From time to time a pet peeve can reach a critical level of annoyance at which it starts to irritate. You google it, hoping to find a solution or at least some allies, but if none turns up and you’re out of time, you simply give up and hope a solution will magically manifest itself one other day. But what if that day never comes? Luckily for us, open source enthousiasts, we can do something about it ourselves 🙂
Context
I’m quite an avid shortcut user. Linux/KDE is an environment where this type of user feels right at home. Not only do most actions in a software have a shortcut, you can also define lots of system-wide or global shortcuts. Kwin, KDE’s window manager defines quite a few out of the box.
Problem
This is all fine and dandy until you want to use this cross-platform software which you got used to in a different environment (i.e. windows at work) and you want to start using it at home. When the application is not (KDE) shortcut friendly or you are so used to the windows keymap that it’s a pain to learn a new scheme, you start to feel frustrated. Learning a new shortcut scheme seems the best solution but this doesn’t work well when you have to maintain 2 shortcut schemes in your head, depending on your environment (home vs work, your computer at work versus a colleague’s computer).
A typical example here would be some IDE, for example Intellij IDEA. Although the IDE does provide a KDE keymap by now, I started using it ages ago when there simply was no alternative keymap (nor a community edition or even official linux version, I guess). Also, I used linux only occasionally back then. These shortcuts are hard-wired by now and it is already hard enough to keep in mind whether I’m using Intellij or Visual Studio.
Another possibility is that the application really needs that much shortcuts that it just can’t bother with the shortcuts which may or may not be defined by the environment or workspace. One example of such complex application is Blender. Try it out and you’ll see what I mean. 😉
KDE, being the configurable desktop environment, does offer some configuration settings. For each window, Kwin allows you to define rules which match certain windows / applications which creates a config. Using this config, you can configure special window attributes. One setting is to block all global shortcuts.
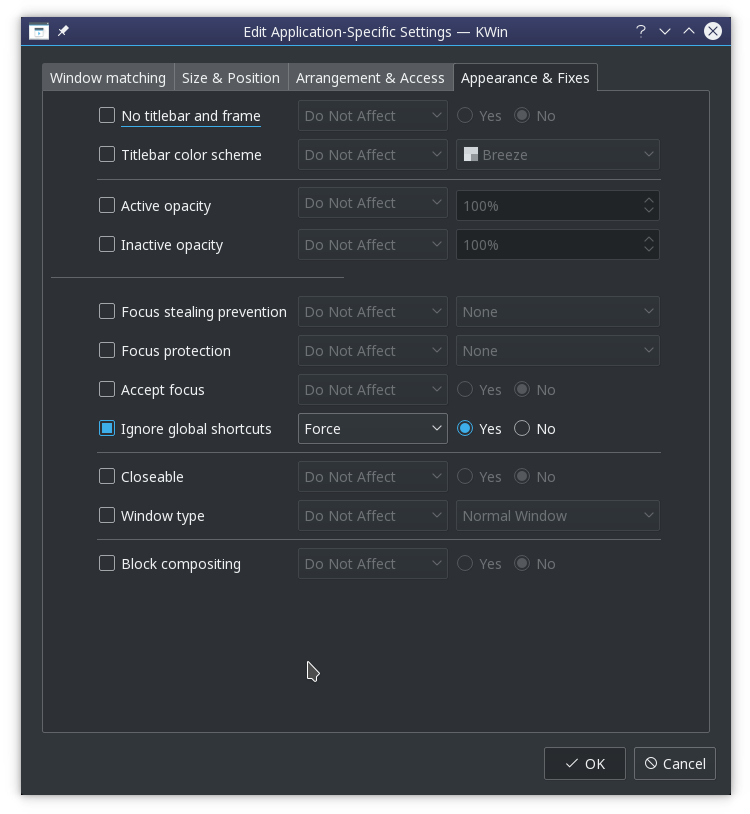
This allows you to use your favorite application with its favorite native shortcuts. Of course, most people use more than 1 application at the same time. However, since all global shortcuts are blocked, the alt+tab shortcut to switch windows is blocked too. Alt+tab is not a special shortcut to KDE, it simply is a shortcut that happens to be assigned globally to the “Walk through windows” action exposed by the KWin component to the System Settings. Lacking any window switching shortcut, you adapt and start using the mouse to switch applications. There are times you cope just fine. But there are other times it is just one thing too much that annoys you. 🙂
Solution
So how to fix this? Just like any other problem you have with an open source application: fetch the source, fix and build! 😉
Since I just wanted a quick fix (I thought, let’s check this out for 30 mins, which turned out to be a lot longer of course), I chose to patch the behavior of the “Ignore global shortcuts” setting to exclude the Alt+Tab shortcut (more precisely, the shortcut currently assigned to the “Walk through windows” action). I briefly investigated KWin’s scripting abilities but it turns out the required functionality is not exposed.
I will now document the process, which took place on opensuse leap 42.3. You may want to tune out now if you don’t care about the gritty tech details. 😉
Where is the source?
I thought it had to be kwin, right? So I checked out the source from github and started searching for “Ignore global shortcuts”. It turned out to just call something in kglobalaccel which is not part of kwin.
Getting my hands dirty, I first fired up a VM I had lying around in order not to f*ck up my currently running system. Next I installed Qt Creator to easily navigate the code. Also, never forget you have to checkout the tag for the version you are currently running! (can be a treasure hunt by itself)
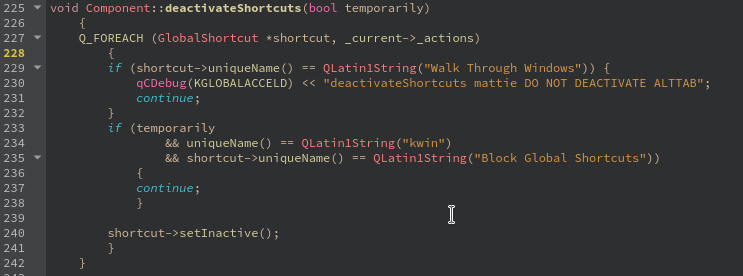
Browsing the source, I finally find a possible tweaking point in the src/runtime/component.cpp -> deactivateShortcuts method. It disables all shortcuts when a window is entered which has a “Ignore global shortcuts” rule. So I simply added an exclusion for the “switch windows” action.
Building a patched rpm
Time to try it out! In order to build it, you will need to install its dependencies. On an rpm based system, the easiest way to go forward is to do a “sourceinstall” of the rpm in case. For that, we first have to know which rpm contains the affected shared object (.so file).
You can take different routes to pin point the rpm. I checked the CMakeLists.txt to see what the output targets were. When you build, you can also see the class pass by and check into which library it gets linked into. Using that .so file, you can find the rpm using “rpm -qf <.so>”
An alternative way would be to find a kde related rpm matching “global” and then checking its contents (using “rpm -q –filesbypkg <rpm>”) for the .so file.
Once you know the rpm, you can easily install all required build dependencies by issueing a zypper sourceinstall command: “zypper si <rpm>”
The hard part: logging
I wanted to add some debug output to see if I was looking at the right place in the source base and how frequently the code got called. Now things got messy. You’d think patching the code was the hard part, guess what.. 😉
I had played with logging before in KDE, but of course things have changed with KDE 5. Nowadays, KDE uses Qt’s default logging mechanism. It meant figuring out the logging category used by kglobalaccel and finding a way to activate it. The logging category was nicely tucked away in logging_p.h: “kglobalaccel-runtime”. Activating it seemed to be trickier. According to the Qt documentation, you can alter the log level through an env var QT_LOGGING_RULES. Since I was adapting a core component, I needed to set the env var before logging in. On opensuse you can create a file /etc/profile.local which gets sourced by /etc/profile.
I added the env var and it seemed to work (=showed up), unfortunately still no logging. More precisely, nothing showed up in ~/.xsession-errors-:0. I started adding log statements all over the place, analysing the .so file to check whether my modified method was actually included in it (readelf -Ws libKF5GlobalAccelPrivate.so.5.32.0 | grep deactivate), etc.. Until I realised I didn’t check the journal (journalctl -b -0) yet, there it was. 🙂 Bonus points: the code change had its intended effect!
End result
So there I had it, a working patch WITH logging ⇒ pure SATISFACTION 🙂
Feel free to share this satisfaction by downloading the .so and installing it in /usr/lib64 (use at own risk). I’ve been using it for 2 months now without problems. It’s a good hack until a more fundamental solution is in place. First steps have been taken! 😉
